Our Viking Clips are great for all of your hardwood siding needs. They come in both on batten and off batten clips that make installing siding a breeze! Install your furring strip (if on batten), attach your clip, slide your board on and repeat, it is just that easy! For off batten, just install your clip, slide your board on and repeat. These clips automatically space your boards for you.
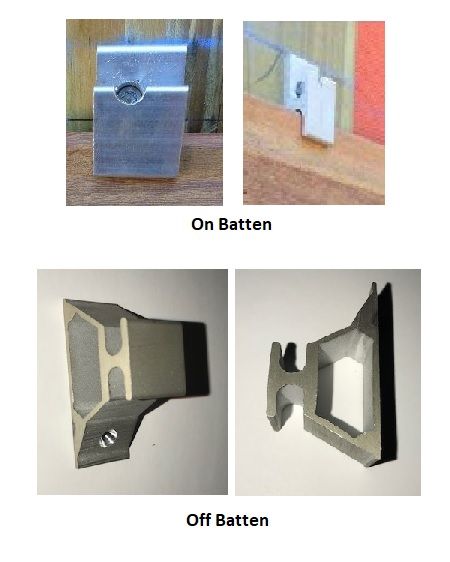


On Batten Clips – $1.25 per set (set includes: 1-marine grade aluminum clip and 1-305 SS screw #7 X 2 1/4″). On Batten is for use on furring strips, etc.
Off Batten Clips – $1.40 per set (set includes: 1-marine grade aluminum clip and 1-305 SS screw #7 X 2 1/4″). Off Batten to install on top of Tyvek or something similar without using a furring strip.
We do discount our clips when they are ordered with your wood.
Installation Guidelines for the Viking Clip for Rain Screen Siding
Installation Guidelines for the Viking Clip/VC2 No-Batten Rain Screen
The Viking Clip and VC2 No-batten hidden fasteners support the finished siding of a double-walled system. This system creates a ventilated airspace between the framed inner wall and the finish rain screen wall. Proper overall design and construction techniques for this system are the builder’s responsibility. In particular, the rain screen requires the following:
- Distance between studs does not exceed 24” – Recommended spacing is 16”.
- Installation of structural sheathing, such as plywood or Oriented Strand Board (OSB) to the framed wall system.
- Application of asphalt-impregnated building paper or house wrap over the wall sheathing to create a moisture barrier and drainage plane.
- Suitable furring strips such as pressure treated 1×3 or marine grade plywood ripped into 2 ½” strips.
- The VC2 No-Batten clips are placed similarly, but directly on the vapor barrier surface at each vertical stud.
An excellent article by the Norwegian Building Research Institute provides a detailed discussion of these design and construction techniques. An English translation of this article is available at the following URL:
https://cdn2.hubspot.net/hub/112655/docs/exterior-ventilated-cladding.pdf?t=1441369896881
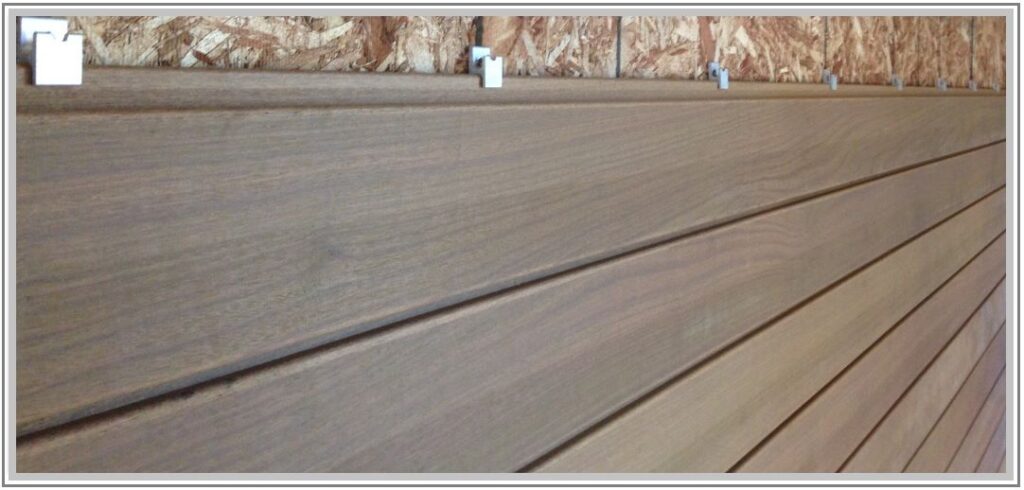
Viking Clip in action
Storage and Handling
Prior to installation, the moisture content of the rain screen siding boards should acclimate to the relative humidity levels of the local environment. Once this occurs, The Viking Clip/VC2 No-Batten rain screen system allows for normal expansion and contraction of the siding. Failure to provide adequate time for this acclimation process may result in seasonal variations to the material exceeding the design tolerances of the rain screen system.
For best results, un-band and stack individual members with enough spacing to allow clear air flow about all four sides of each plank. This takes a little time, and it’s worth the effort. In a matter of days, your siding will be ready to yield optimal results.
The siding bundles should be loosely covered with a water-resistant tarp to prevent exposure to rain and direct sunlight, never restricting free air flow to the top and sides of the bundle.
Siding Board Preparation
Inspect the siding for evidence of discoloration and consider applying a wood brightener such as Defy or Citralic Wood Brightener to restore the original color. Careful power washing or sanding is often effective in removal of the graying. Brush and clean the board surfaces, then apply a semi-transparent sealer with UV inhibitors to all four sides of each board. To avoid tacking and sagging of the sealer, apply in successive thin coats.
Some boards will require cuts to finish off a course, meet windows or door, or to avoid bows. The topmost level, where the siding meets the lower margin of the roof, needs at least a ¾” ventilation gap between the top of the final siding course and the eave. This same gap is needed beneath the window openings. For end cuts, apply a wax-based sealer to reduce the likelihood of cracks and checks. Top course boards require pre-drilling and face screws at the top of the board.
Rain Screen Assembly
Before beginning the installation of the Viking Clip/VC2 No-Batten rain screen, ensure that all windows and doors, including trim, flashing and counter flashing is in accordance with the manufacturer’s instructions and in compliance with local building codes. To allow for potential expansion of the siding boards, a 1/8” gap should be present between board ends and adjacent window and door borders, as well as any other abutment sites.
A contemporary garapa rain screen example.
Install vertical furring strips with exterior wood screws to the stud through the vapor barrier and sheathing.
Establish a starter course. Be certain that the starter course boards do not contact the ground, concrete slabs, or deck materials at any point. (Again, a 3/4″ gap is recommended for spacing at the envelope base.)
Viking Clip/VC2 No-Batten Installation
The Viking Clip/VC2 No-Batten Rain Screen systems include 2 ¼“, #7 trim head, 315 grade stainless-steel screws. After establishing the starter course height, screw Viking Clips through the furring strips and exterior sheathing at each stud, no further than 24″ on center from the preceding clip. Use clips at butt joints, one at each board end, at the top and bottom of the siding. tighten all screws for a flush mount.
Insert the first siding board into the previously attached Viking Clips, adding additional boards lengthwise along the level line until reaching the end of the course. Cut to complete the starter row, so that an 1/8″ gap is present between the siding and the window/door abutments.
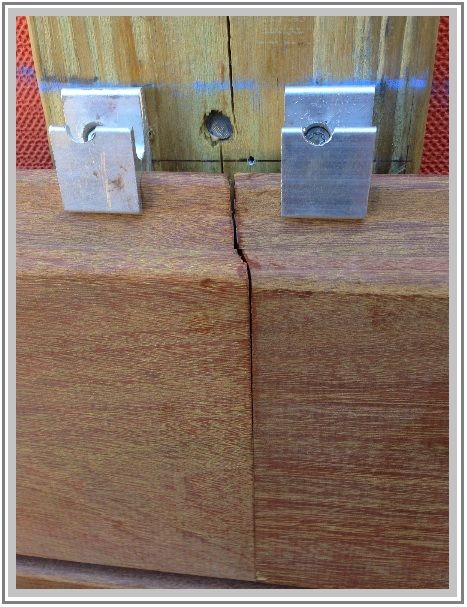
Rainscreen siding with Viking Clip. KCPD North Patrol, KCMO.
It is not necessary to jam, pound or otherwise force boards into the clip. If pieces are not fitting properly, the board may be bowed or bent. Cut the deformation out or use another board in its place.
Finishing Up
Repeat this process, checking alignment and level on each row until the finish course. Again, allow at least a ¾” ventilation gap. (Gaps are also necessary beneath all window openings.) Install flashing and counter flashing where side wall meets roof in accordance with the roofing manufacturer’s instructions. We recommend installing insect screens at these and any other ventilation gaps.
With this technique, the only exposed fasteners exist on the top course, if clips may be implemented for a full piece at the bottom. It’s a good idea to check layout due to variance in material width and wall height. Exposed fasteners may also be countersunk and plugged if desired.