


Step 1: Installing the First Board
Apply a bead of exterior adhesive to each joist approximately 3/8” in width (you may want to do this as you go so that it does not dry before completion if you have a larger area to install). While this gives more holding strength to the boards, its primary purpose is to help prevent any squeaking from uneven joists. Even though your joists may seem even, changes in weather can cause movement in the future. Use an 1/8” drill bit with a 3/8” countersink to pre-drill a hole for the initial face driven screws and wood plugs. (The DeckWiseTM Drill & Drive pictured above (not included in Ipe Clip® Fastener kits) is a 3-in-1 drill bit, countersink bit, and screwgun tip that will help speed up this process). All Ipe Clip® Hidden Deck Fastener kits include an 1/8” High Speed Drill Bit.

Step 2: Installing the First Board (continued)
Install the initial face screws for the first board. All Ipe Clip® complete fastener kits have extra stainless steel screws included in them for this step.

Step 3: Plugging the face screwed boards
Place a dab of glue into the countersink hole from steps 1 & 2. Insert an Ipe Clip® 3/8” Tapered Ipe Plug and tap it down so it fits snug into the hole. After the glue on each plug has set, remove any part of the Ipe plug that protrudes above the deck board. You can accomplish this by using a small saw or belt sander.

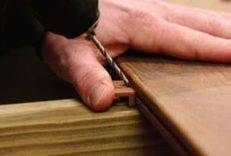
Step 4: Cut slots for Ipe Clip® Hidden Deck Fasteners
Note: Pre-grooved decking is now available from many decking suppliers. (If you are using Pre-grooved decking, skip this step and proceed to step 5). Use a biscuit jointer or a router to cut a slot in the edge of deck board above each joist. You will want to center this groove in the board so that you have a symmetrical profile. It is recommended to apply a small amount of construction adhesive on the joists as deck boards are installed.
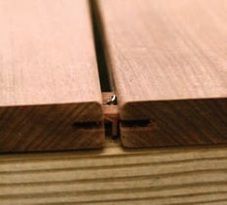
Step 5: Predrill a Pilot Hole
Insert one Ipe Clip® fastener into the groove of the deck board above each joist. Where two boards meet on a single joist, only one fastener is needed. Drill an 1/8” pilot hole at a 45° angle for each screw when installing Ipe Clip® fasteners into hardwood decking. You only need to predrill through the hardwood. This is to avoid splintering and to make sure the decking is pulled tight to the joist by the screw in the next step.

Step 6: Screwing Ipe Clip® Fasteners
Run the stainless steel screws at approximately a 45° angle through the hole in the center of the Ipe Clip® fastener, through the deck board, and down into the joist. It should not take much torque to fasten the deck board. Once the board is snug to the joist you can install the next fastener. A screw gun with a clutch setting works great for this as you can turn the clutch down to as little torque as you need. Fasten each board using one fastener and one screw per joist.
Step 7: Installing Deck Boards Over Exposed Side of the Ipe Clip® Fastener
Again, if pregrooved decking is not being used, use a biscuit jointer or a router to cut a slot into the edge of the next deck board above the joist. Slide this board onto the Ipe Clip® fasteners protruding from the previously fastened deck board. Note: When using Ipe Clip® ExtremeKD™ or Extreme4™ fasteners you can use the spacer tools provided to ensure that you do not crush the leg of the fastener while keeping your deck boards tight. Remove spacer tools as soon as deck board is fastened.

Step 8: Installing the Last Deck Board
On the last board it is necessary to fasten the outside edge with surface screws. These screws can be concealed by countersinking a 3/8” hole and using the wood plugs supplied. It is also recommended to apply a small amount of construction adhesive on the joist for the last deck board.